Choose how and when to switch mail on or set up dual delivery
Set up a domain alias if you'd like to receive mail at an additional domain
Turn on Offline Gmail, Tasks and other Gmail Labs
Configure a signature
Learn about mail notifications and mailto links
>
Note that mail migration, mobile setup, Microsoft Outlook
configuration, and Postini activation are covered in later sections of
the guide.
How would you like to switch mail?
You have the option of switching everyone at your organization to
Google Apps at once or running a pilot and moving over users to Google
Apps in several phases.>
If you're ready to switch now,
you'll need to change your Mail Exchange (MX) records. This should be
the last step of your Google Apps setup process. For now, we suggest
that you review the instructions in this section for switching, and
we'll remind you to actually switch your mail in the final section of
this guide.
If you're running a pilot for some of your users,
you'll configure a dual or split delivery in which messages can be
delivered to your old mail system and Google Apps. You can set up dual
or split delivery now, or as soon as your pilot users are ready to
start using Google Apps.
If you purchased your domain name from
one of Google’s registration partners, GoDaddy or eNom, Google will
configure your MX records for you.
Please choose an option:
Change MX Records
Review these instructions now, but don't switch your Mail Exchange
(MX) records until you've reached section 10 of this guide. We'll
remind you to return here when it's time to switch them.>
MX records determine where mail is delivered when someone sends mail to your domain name.
In order to have Google host your mail, you'll need to switch your MX
records to point to Google's servers. This process involves working
with your domain host. You can make these changes in under an hour,
however, it can take longer for them to propagate.
If done properly, there will be no downtime for your organization.
Requirements
Ability to modify your advanced DNS
All users that need to receive mail at the domain have been created as users, nicknames or groups
How to do it
In your control panel, below the Service Settings section of the page, and next to the Email icon, click Activate Email.
Click Change MX records.
Follow the instructions to change your MX records with your domain host.
Each hosting service has slightly different instructions for changing MX records.
Your MX records can propagate in as quickly as an hour.
However, it can take up to 48 hours. You can check the status by
conducting an MX record lookup.
When creating a domain alias, mail addressed to >user@def.com and user@ghi.com will be delivered to the inbox of user@abc.com.
Many organizations need to allow users to send and receive mail from
additional domain names. For instance, you may also own a .org or .net
version of your domain.
In Google Apps these additional or alternate domain names are called domain aliases. If you own the domains abc.com, def.com and ghi.com, you can create a primary Google Apps account for abc.com and add def.com and ghi.com as domain aliases to abc.com.
Please choose an option:
Add a domain alias
Setting up a domain alias is much like verifying ownership and
switching MX records for your primary domain. It should take less than
an hour to configure. Though, keep in mind that it may take longer for
the DNS changes to propagate.
>
Requirements
Access to the advanced DNS for a domain and the ability to change its MX records
How to do it
Log in to your control panel at panel at
https://www.google.com/a/your_domain.com. Be sure to replace
your_domain.com with your actual domain name.
Click Domain settings.
Click Domain names.
In the Domain alias section, click Add a domain alias.
Add the domain name you want as an alias, and click Continue and verify domain ownership.
Click I have completed these steps. It may take up to 48 hours for your MX records to update.
You can check the status of the domain alias next to the domain name in the Domain names section of your control panel. If you've just clicked Verify or I have completed these steps, it should read Updating.
Configure Mail Settings
There are a couple of settings that you may want configure, test and
use right away after. This section applies to both those running a
one-time switch to Google Apps for their organization, and those
running phased deployments and pilots for some of their users. The
topics covered in this section include:
>
Enabling Gmail Labs and setting up Google Tasks and Gmail Offline
Configuring a signature
Understanding notifications and mailto links
You can also setup delegation to your email account so another person can manage your mail and contacts by following these instructions.
Enable Gmail Labs
By choosing to enable Gmail Labs, your organization can try out some
of Gmail's newest features. Some of these features are quite useful for
businesses and organizations, so we've allowed Premier and Education
Edition administrators to opt-in to Gmail Labs for their domain.>
Because Gmail Labs are experimental, they may break and aren't supported by the Google Apps support team.
Examples of Gmail Labs that may be useful in a business or school setting include:
Gmail Offline
Tasks
Search Autocomplete
Message Translation
Advanced IMAP Controls
Requirements
Gmail Labs are available for all editions
Internet Explorer 7.0+, Firefox 2.0+, Safari 3.0+, or Google Chrome
How to do it
Google Apps administrators need to opt-in to Gmail Labs by checking the enable Gmail labs for my users checkbox in the Email Settings of your control panel. Once you'e enabled Labs, it can take 24 hours for them to appear in your accounts. Note that voice and video chat are not part of Gmail Labs, and can be enabled or disabled separately in the same part of your control panel.
If you run into problems with a lab, go to http://mail.google.com/mail/?labs=0 to temporarily disable Labs and get your account back to normal.
If you have a question or feedback about labs, visit the Labs feedback group
If you're interested, new labs will be posted to the Gmail Blog as they're released.
Configure a signature
Many users append a signature to the bottom of their outgoing
messages. With Gmail, you can easily configure a plain text signature
by visiting the >settings tab of your mail account. Your users will be able to add and modify their signatures themselves.
HTML or rich text signatures are not currently supported. There are several third party options available if this is a crucial requirement.
If you'd like to append a footer to all outbound messages, can can
activate the Postini service. Postini is covered in section 9 of this
guide.
How to do it
Sign in to your Google Apps mail account.
Click Settings at the top of the page.
Enter your new signature text in the box at the bottom of the page next to the
Signature option. As you type, the radio button will shift from No Signature to the text box.
Click Save Changes.
Gmail adds your signature in grey at the very bottom of your
message. Signatures are separated from the rest of your message by two
dashes.
If you don't want your signature to appear on a specific message,
you can delete it manually before sending the message. Just highlight
the text and delete it before sending.
Learn about mail notifications and mailto links
In switching to a web-based client from a desktop client, one of the
things your users may notice is how Gmail handles notifications and
mailto links.>
Notifications alert users that they've received an incoming message.
This section addresses desktop mail notifications. Section 8 addresses
mobile notiifications.
Mailto links reference email addresses. When clicked, they
place an email address in the to field of the message of your default
system client.
How to do it
PC users
The best option to receive notifications and configure mailto links is to use Google Talk. By default, you'll be alerted to incoming messages.
To have Google handle mailto links, click Settings in Google Talk.
In the General section check Open Gmail when I click on email links.
Note that not all mailto links will be handled by Google Talk,
such as links outside of a web browser. For further integration with
the Windows desktop or alternative options for maillto links, consider
a third party product in the Google Solutions Marketplace.
Mac Users
Mac users OS X 10.4 and above, can use the Google Notifier for Mac for
notifications and handling of mailto links. To learn more, visit the download page.
Next Steps
You've now learned about the core aspects of configuring Google Apps
mail. We'll remind you when it's time for you to actually switch mail
in section 10 of this guide.>
Continue on to set up calendars, contacts and more.
Tell us how we're doing: Please answer a few questions about your experience to help us improve the Google Apps Setup Guide.
What mail system are you configuring for dual delivery?
If you've decided to switch to Google Apps for some of your users, your first step is to set up mail routing.>
You
won't be required to modify MX records and users on your existing mail
system will not be affected. Users on both Google Apps and your old
system will be able to send mail from your domain name.
Dual delivery can be configured in a matter of several hours.
How you set up phased mail delivery depends on your current mail system.
Please choose an option:
Configure dual delivery for on-premise or hosted Microsoft Exchange
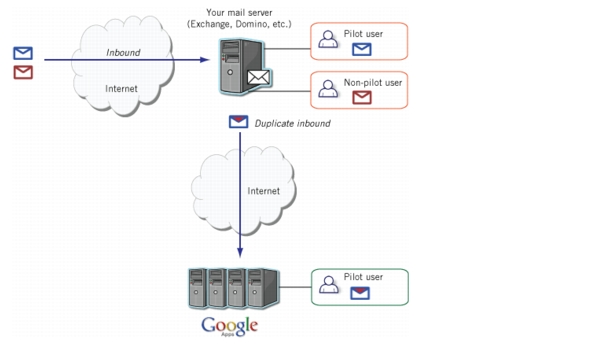
If you're transitioning from hosted or on-premise Microsoft
Exchange, you will need to configure a shadow domain and configure mail
forwarding using Active Directory.>
Messages will still route
to your Exchange server. From there, Exchange will then forward a copy
of these messages to a subdomain for your domain that is configured as
a domain alias in Google Apps.
All email is delivered to your Exchange server, and pilot users receive
their messages on the server, as usual. Exchange also sends copies of
pilot users’ messages to Google Apps.
Note that you will not have to Change MX records for your primary domain or modify mail flow for non-pilot users.
This process should take a couple hours to setup and then a matter of minutes to configure for new users moving forward.
Although
these steps have only been tested in Exchange 2003, they should be very
similar to the setup steps for other versions of Exchange.
Requirements
Administrative access to Active Directory
Premier Edition for proper handling of Spam filtering
Subdomain or alternative domain that has Google MX records
How to do it
Part 1: Add a domain alias in Google Apps
The first step in configuring dual delivery is to add a domain
alias in Google Apps, so Google Apps can receive email sent to a
subdomain or other non-primary domain.
For
example, if you add the alias gtest.solarmora.com to the Google Apps
account for solarmora.com, all of your users can receive email at
addresses in the format user@gtest.solarmora.com in their inboxes for
user@solarmora.com.
You can add a domain alias to Google Apps using any domain or
subdomain for which you can create a CNAME record and MX records. In
most cases, it’s best to create a subdomain at the existing primary
domain and use it as alias in Google Apps; therefore, the following
steps refer to adding an alias with a subdomain. However, the steps
also apply to using an non-primary domain.
Follow these steps to add your domain alias in Google Apps:
Log in to your Google Apps control panel: Visit
http://www.google.com/a/your_domain.com and enter your administrator
user name and password.
Click the Domain Settings tab at the top of the dashboard, and then click Domain Names.
In the Domain alias section, click Add a domain alias.
Enter the subdomain you'd like you mail server to forward messages to.
Make sure to add a subdomain that isn't already in use by your organization, such as gtest.your_domain.com.
Click Continue and verify domain ownership.
Part 2: Verify and configure the subdomain
After you add your subdomain in Google Apps as an alias, you
must verify ownership of your domain and configure MX records for the
subdomain to point to Google’s servers.
To ensure email delivery to the subdomain you added as an alias
in Google Apps, you must verify ownership of your domain, before you
change the MX records for the subdomain. The instructions for verifying
domain ownership appear in the control panel after you complete the
steps to add the alias.
To verify ownership of your domain and change MX records for your subdomain:
If you need to return to the instructions for verifying your domain:
In the control panel, click Domain settings > Domain names.
In the Domain alias section, click Activate alias below the alias you want to add.
Select the method you want to use to verify that you own your domain:
Upload an HTML file: Create an HTML file
containing a unique string of letters and numbers and upload it with
your domain host to the location specified.
Change your CNAME record: Create a unique
CNAME record with your domain host. Make sure you create the CNAME
record for your subdomain, rather than for your primary domain. For
example, to verify the domain alias gtest.solarmora.com, create a CNAME
record for google1ace5670012f99fe.gtest.solarmora.com, which points to
google.com. Also, make sure to copy and paste your unique string from
the control panel.
When you've made the necessary changes with your domain host, return to your Google Apps control panel and click Verify and continue to setup email delivery.
In the drop-down menu on the page that appears, select
your domain host to display instructions for changing the MX records
for your subdomain to point to Google's mail servers. However, do not
follow the instructions exactly, because they explain how to set the MX
records for your primary domain, not a subdomain.
Access your domain hosting system to create the
subdomain you just added as an alias, then configure the MX records for
the subdomain only to point to Google's mail servers, using the server
addresses provided in the instructions.
Once you've configured your MX records, return to the
instructions page in your Google Apps control panel, and click I have
completed these steps. Our system will begin checking for your HTML
file or CNAME record and your MX records. The status of your
verification appears on the Domain names tab.
If you have questions about setting MX records for a subdomain,
contact your domain host for assistance. It can take up to 48 hours for
our system to detect the changes you've made. If your alias isn't
active after 48 hours, verify with your domain host that all settings
are correct, and then contact Google support or your Google
representative for further assistance. Once our system detects the
changes for the subdomain, the alias appears as “Active.”
Finally, to ensure proper spam classification of messages
routed through Exchange, add the outgoing IP addresses of your Exchange
server to the Inbound gateway section of the Email Settings section of your control panel.
Take caution that you enter the IP addresses in the Inbound Gateway field, not the Email whitelist
Note that because your MX records don't point to
Google's servers, the control panel will indicate that mail is not
active. However, this warning is only cosmetic and will be disabled
once you switch entirely to Google.
Part 3: Configure dual delivery with Active Directory
Once your domain alias is up and running, you’re ready to
configure your Exchange server for dual delivery. Because each user
account in Exchange can only have one email address associated with it,
you’ll need to create an Active Directory Contact object for every user
who will be using dual delivery.
Here’s how to add a Contact object for one of your users:
Open Active Directory Users and Computers.
Connect to the domain you’re using in your pilot.
Create a new organizational unit to house Contact objects for your pilot users and name it Google Apps Pilot. Right-click the new organization, point to New, and select Contact.
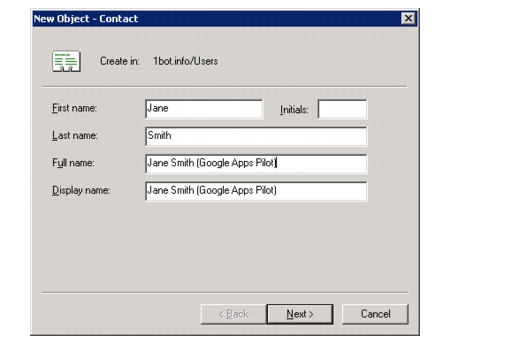
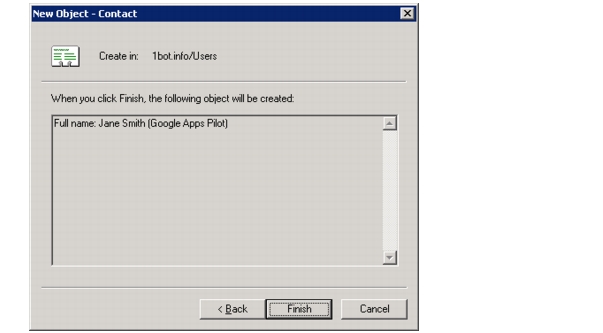
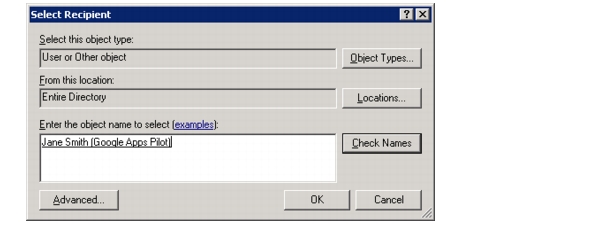
Enter the new contact information as shown in the following figure.
Enter the pilot user’s first and last name as usual, but make sure to
note in the contact’s display name that it is associated with your
Google Apps Pilot. For example, Jane Smith’s display name is “Jane
Smith (Google Apps Pilot).” It’s important to add this note to each
contact you create for your pilot users, to help distinguish between
the new contact and the existing primary user account.
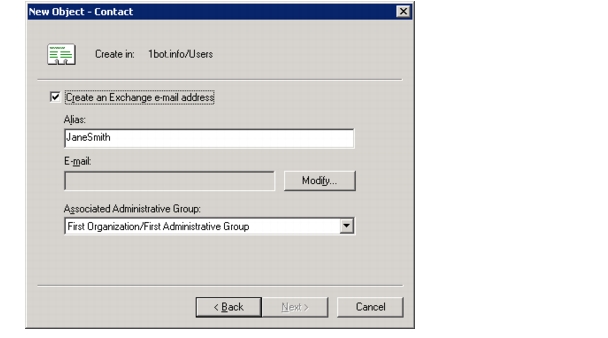
Click Next. Accept the default alias provided.
Verify that the Create an Exchange e-mail address check box is selected, and then click Modify.
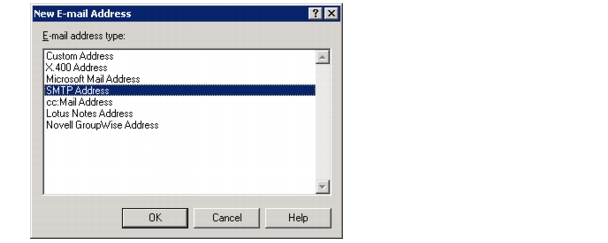
In the New E-mail Address box, select SMTP Address, and then click OK.
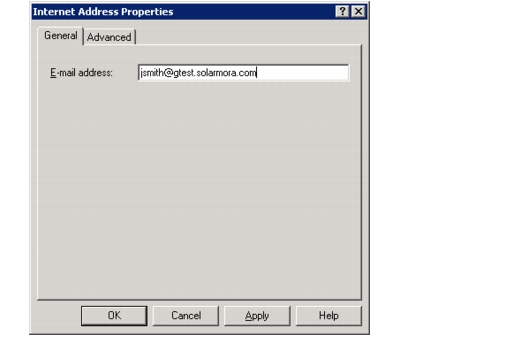
In the Internet Address Properties box, enter the user's Google Apps subdomain alias e-mail address in the E-mail address field, and then click OK.
Click Next, and then click Finish.
You’ve successfully added a Contact object for one of your pilot users.
Optional: To avoid confusion, hide the newly created Contact
object from the Exchange Global Address List for your domain, as
follows:
Return to Active Directory Users and Computers and navigate to the organization in which you stored your new contacts.
Next, double-click the contact you’d like to modify.
In the Exchange Advanced tab, check the box next to Hide from Exchange address lists.
Click OK to save the change. Repeat this process for each Contact object.
Complete these steps for each pilot user.
After you’ve added Contact objects for your pilot users, set up dual delivery for each user in Active Directory, as follows:
Open Active Directory Users and Computers.
Connect to the domain in which your pilot users are stored, and navigate to the appropriate organization.
Note that in this phase of setup, you must access the settings
for your primary user accounts, not the Contact objects you just
created.
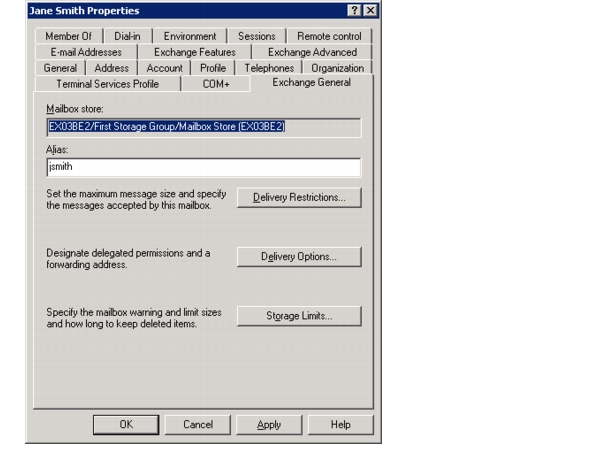
Double-click the user you want to modify.
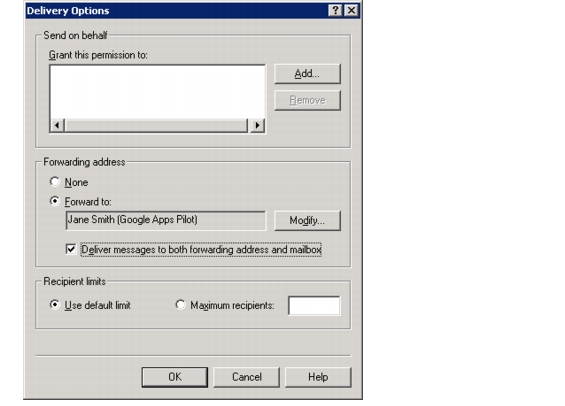
On the Exchange General tab of the properties window, click Delivery Options.
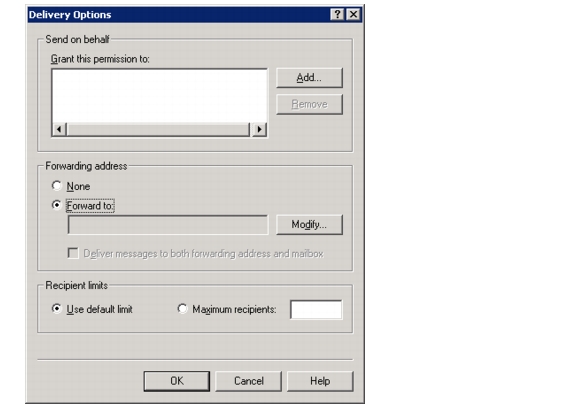
In the Forwarding address section, select Forward to, and then click Modify.
Type in the address of the contact you entered for this user. You can click Check Names to look up the contact. Click OK.
In the Delivery Options window, verify that the correct display name is shown in the Forward to box.
The contact should be labeled as “Google Apps Pilot,” which you
added when you set up the Contact object. If you see only the user’s
first and last names, you may have entered the user’s primary account
rather than the secondary contact. If so, email won’t be forwarded to
Google Apps.
Check or uncheck the box next to Deliver messages to both forwarding address and mailbox.
Especially at the beginning of your pilot, you may want to
deliver pilot users email to both Google Apps and your mail server, to
ensure you have a backup. Uncheck the box if you want pilot users to
access new messages only in Google Apps.
Keep in mind that changes you make to this setting will take
effect immediately. Make sure you communicate to your users about these
changes before discontinuing delivery to their Exchange mailboxes.
Click OK, then click OK again to complete configuration.
Repeat these steps for each pilot user.
You’ve now successfully configured dual delivery on your Exchange server.
Transition from a pilot to a full deployment
Once you're ready to switch everyone to Google Apps, it's easy to
move from a pilot to a deployment. We'll remind you to return back to
this step section 10, when you're ready to switch for your entire
organization. Review the instructions and learn about the process
below.
>
How to do it
If you're on Premier Edition, you may need to purchase additional users
Create any additional users, nicknames or groups that need to receive mail for your domain
Proceed to the next step to learn about how to switch MX records for the entire domain.
Configure dual delivery for IBM Lotus Notes
Follow these instructions if you are piloting Google Apps or are
planning to configure co-existence with a Lotus IBM Notes Domino Server
and Google Apps.>
All email is delivered to your Lotus Notes server, and pilot users
receive their messages on the server, as usual. Lotus Notes also sends
copies of pilot users’ messages to Google Apps.
Requirements
Administrative access to Domino Directory
Premier or Education Edition for proper handling of Spam filtering
Subdomain or alternative domain that has Google MX records
How to do it
Part 1: Add a domain alias in Google Apps
The first step in configuring dual delivery is to add a
domain alias in Google Apps, so Google Apps can receive email sent to a
subdomain or other non-primary domain.
For
example, if you add the alias gtest.solarmora.com to the Google Apps
account for solarmora.com, all of your users can receive email at
addresses in the format user@gtest.solarmora.com in their inboxes for
user@solarmora.com.
You can add a domain alias to Google Apps using any domain or
subdomain for which you can create a CNAME record and MX records. In
most cases, it’s best to create a subdomain at the existing primary
domain and use it as alias in Google Apps; therefore, the following
steps refer to adding an alias with a subdomain. However, the steps
also apply to using an non-primary domain.
Follow these steps to add your domain alias in Google Apps:
Log in to your Google Apps control panel: Visit
http://www.google.com/a/your_domain.com and enter your administrator
user name and password.
Click the Domain Settings tab at the top of the dashboard, and then click Domain Names.
In the Domain alias section, click Add a domain alias.
Enter the subdomain you'd like you mail server to forward messages to.
Make sure to add a subdomain that isn't already in use by your organization, such as gtest.your_domain.com.
Click Continue and verify domain ownership.
Part 2: Verify and configure the subdomain
After you add your subdomain in Google Apps as an alias, you
must verify ownership of your domain and configure MX records for the
subdomain to point to Google’s servers.
To ensure email delivery to the subdomain you added as an alias
in Google Apps, you must verify ownership of your domain, before you
change the MX records for the subdomain. The instructions for verifying
domain ownership appear in the control panel after you complete the
steps to add the alias.
To verify ownership of your domain and change MX records for your subdomain:
If you need to return to the instructions for verifying your domain:
In the control panel, click Domain settings > Domain names.
In the Domain alias section, click Activate alias below the alias you want to add.
Select the method you want to use to verify that you own your domain:
Upload an HTML file: Create an HTML file
containing a unique string of letters and numbers and upload it with
your domain host to the location specified.
Change your CNAME record: Create a unique
CNAME record with your domain host. Make sure you create the CNAME
record for your subdomain, rather than for your primary domain. For
example, to verify the domain alias gtest.solarmora.com, create a CNAME
record for google1ace5670012f99fe.gtest.solarmora.com, which points to
google.com. Also, make sure to copy and paste your unique string from
the control panel.
When you've made the necessary changes with your domain host, return to your Google Apps control panel and click Verify and continue to setup email delivery.
In the drop-down menu on the page that appears, select
your domain host to display instructions for changing the MX records
for your subdomain to point to Google's mail servers. However, do not
follow the instructions exactly, because they explain how to set the MX
records for your primary domain, not a subdomain.
Access your domain hosting system to create the
subdomain you just added as an alias, then configure the MX records for
the subdomain only to point to Google's mail servers, using the server
addresses provided in the instructions.
Once you've configured your MX records, return to the
instructions page in your Google Apps control panel, and click I have
completed these steps. Our system will begin checking for your HTML
file or CNAME record and your MX records. The status of your
verification appears on the Domain names tab.
If you have questions about setting MX records for a subdomain,
contact your domain host for assistance. It can take up to 48 hours for
our system to detect the changes you've made. If your alias isn't
active after 48 hours, verify with your domain host that all settings
are correct, and then contact Google support or your Google
representative for further assistance. Once our system detects the
changes for the subdomain, the alias appears as “Active.”
Finally, to ensure proper spam classification of messages
routed through Lotus Notes, add the outgoing IP addresses of your Lotus
Notes server to the Inbound gateway section of the Email Settings section of your control panel.
Take caution that you enter the IP addresses in the Inbound Gateway field, not the Email whitelist
Note that because your MX records don't point to
Google's servers, the control panel will indicate that mail is not
active. However, this warning is only cosmetic and will be disabled
once you switch entirely to Google.
Part 3: Configure mail delivery in Lotus Notes
Follow the steps described on the IBM support site
to create a Global Domain Document in your Domino Directory and to send
email via SMTP for addresses outside of the local internet domain. The
Global Domain Document should exclude the Google Apps subdomain (e.g.,
galias.your_domain.com) forcing email sent to your Google Apps users to
route via SMTP over the internet to Google's servers.
For more information on configuring your Lotus IBM Notes Domino Server see the IBM Support & downloads site at http://www-1.ibm.com/support.
Please note that this section contains links to help content
managed by IBM. While external help content can be an excellent
resource, the Google Apps support team is not responsible for the
content of these articles.
Configure Dual Delivery through Google Apps
If you're currently using a hosted web-mail provider, you can configure dual delivery in the Google Apps Control Panel. >
This allows you to switch your MX records to Google and continue to have mail delivered to your old webmail solution.
In this configuration, all email is delivered to Google Apps, which
routes it to your existing email system. Pilot users receive their
email on both Google Apps and your existing email system.
Requirements
Premier or Education Edition
Your current email system must send messages out to the Internet
Access to advanced DNS to change MX records for domain name
How to do it
In the control panel, click service settings, and select Email.
In the Email routing section, click Add a destination
and enter the information for the server to which you want to route
mail during migration. If your mail server's hostname is the domain
name, then you'll need to create a new MX record pointing to this
server (example: routing.domain.com IN MX 10 domain.com.)
For the Deliver email for option, select...
All Accounts to have all mail delivered to Google and your old solution. This is considered a dual delivery.
Provisioned accounts only to have mail delivered to Google and your old solution just for the users you've created on Google Apps
Unknown Accounts to have all mail delivered
to Google and then only sent to your old solution for users that
haven't been created on Google Apps. This is considered a split
delivery.
If you want to make sure that messages addressed to
unprovisioned email addresses aren't lost during migration, we
recommend creating a catch-all address to 'drop' mail in your old mail
system.
Lastly, change your domain's MX records to point to Google's mail servers (Instructions)
Mail will now be routed according to the settings you configured in step 3 of this process.
Transition from a pilot to a full deployment
Because your MX records already point to Google Apps, making the
full switch will be very easy. Review and learn about the process
below. We'll remind you to do this step in section 10, when you're
ready to switch over your entire organization.
>
How to do it
Once you're ready to switch everyone over, simply purchase and create additional users as needed.
Once a user, nickname, or group has been created in Google Apps for all
addresses that receive mail at your domain, you can change your pilot
configuration to a production deployment by simply removing the Google
Apps email routing setup that sends copies of your messages to your
existing email system.
Can you forward mail to external addresses?
If you can auto-forward messages from your old server to an external
address, then you can easily set up a dual delivery. Forwarding can
occur on domain wide level or a user level.
Please choose an option:
Configure mail routing with forwarding
If you can forward messages outside of your domain, you can
configure a dual delivery easily and without interrupting your existing
mail flow.
>
All email is delivered to your old server, and pilot users receive
their messages on the old server, as usual. The old server also sends
copies of pilot users’ messages to Google Apps.
Requirements
A mail server that can forward incoming messages outside the domain
Premier or Education Edition for proper handling of Spam filtering
Subdomain or alternative domain that has Google MX records
How to do it
Part 1: Add a domain alias in Google Apps
The first step in configuring dual delivery is to add a
domain alias in Google Apps, so Google Apps can receive email sent to a
subdomain or another non-primary domain.
For
example, if you add the alias gtest.solarmora.com to the Google Apps
account for solarmora.com, all of your users can receive email at
addresses in the format user@gtest.solarmora.com in their inboxes for
user@solarmora.com.
You can add a domain alias to Google Apps using any domain or
subdomain for which you can create a CNAME record and MX records. In
most cases, it’s best to create a subdomain at the existing primary
domain and use it as alias in Google Apps; therefore, the following
steps refer to adding an alias with a subdomain. However, the steps
also apply to using an non-primary domain.
Follow these steps to add your domain alias in Google Apps:
Log in to your Google Apps control panel: Visit
http://www.google.com/a/your_domain.com and enter your administrator
user name and password.
Click the Domain Settings tab at the top of the dashboard, and then click Domain Names.
In the Domain alias section, click Add a domain alias.
Enter the subdomain you'd like you mail server to forward messages to.
Make sure to add a subdomain that isn't already in use by your organization, such as gtest.your_domain.com.
Click Continue and verify domain ownership.
Part 2: Verify and configure the subdomain
After you add your subdomain in Google Apps as an alias, you
must verify ownership of your domain and configure MX records for the
subdomain to point to Google’s servers.
To ensure email delivery to the subdomain you added as an alias
in Google Apps, you must verify ownership of your domain, before you
change the MX records for the subdomain. The instructions for verifying
domain ownership appear in the control panel after you complete the
steps to add the alias.
To verify ownership of your domain and change MX records for your subdomain:
If you need to return to the instructions for verifying your domain:
In the control panel, click Domain settings > Domain names.
In the Domain alias section, click Activate alias below the alias you want to add.
Select the method you want to use to verify that you own your domain:
Upload an HTML file: Create an HTML file
containing a unique string of letters and numbers and upload it with
your domain host to the location specified.
Change your CNAME record: Create a unique
CNAME record with your domain host. Make sure you create the CNAME
record for your subdomain, rather than for your primary domain. For
example, to verify the domain alias gtest.solarmora.com, create a CNAME
record for google1ace5670012f99fe.gtest.solarmora.com, which points to
google.com. Also, make sure to copy and paste your unique string from
the control panel.
When you've made the necessary changes with your domain host, return to your Google Apps control panel and click Verify and continue to setup email delivery.
In the drop-down menu on the page that appears, select
your domain host to display instructions for changing the MX records
for your subdomain to point to Google's mail servers. However, do not
follow the instructions exactly, because they explain how to set the MX
records for your primary domain, not a subdomain.
Access your domain hosting system to create the
subdomain you just added as an alias, then configure the MX records for
the subdomain only to point to Google's mail servers, using the server
addresses provided in the instructions.
Once you've configured your MX records, return to the
instructions page in your Google Apps control panel, and click I have
completed these steps. Our system will begin checking for your HTML
file or CNAME record and your MX records. The status of your
verification appears on the Domain names tab.
If you have questions about setting MX records for a subdomain,
contact your domain host for assistance. It can take up to 48 hours for
our system to detect the changes you've made. If your alias isn't
active after 48 hours, verify with your domain host that all settings
are correct, and then contact Google support or your Google
representative for further assistance. Once our system detects the
changes for the subdomain, the alias appears as “Active.”
Finally, to ensure proper spam classification of messages
routed through your old mail server, add the outgoing IP addresses of
your old mail server server to the Inbound gateway section of the Email Settings section of your control panel.
Take caution that you enter the IP addresses in the Inbound Gateway field, not the Email whitelist
Note that because your MX records don't point to
Google's servers, the control panel will indicate that mail is not
active. However, this warning is only cosmetic and will be disabled
once you switch entirely to Google.
Part 3: Configure mail delivery for your old mail server
Lastly, you'll need to configure forwarding for your pilot
users. Once you've done so, mail addressed to them will route through
your old server and then be forwarded to Google Apps.
Configure mail routing without forwarding
If you're unable to forward messages, we suggest considering a
one-time switch and change MX records once you're comfortable with the
product.
>
Continue on to learn more about doing a one-time switch and changing MX records.